
Chapter 5 of 15
SSL and HTTPS
How to add a free Let's Encrypt SSL certificate, your own certificate or Cloudflare Origin CA, and what to do when issuing fails.
In this guide
An SSL certificate makes your site open with https:// and the padlock in the browser. This chapter shows how to turn it on, which certificate type to choose and how to fix things when a certificate will not issue.
What SSL is
SSL (today also called TLS) is a certificate that encrypts the connection between a visitor and your site. Without it, browsers mark the site as "not secure" and anything typed into forms (passwords, orders) travels unprotected. With a certificate, the address starts with https://.
You can see the status on the site's Overview page in the hosting panel: the HTTPS row shows Enabled or Disabled. Your account at host.appalbania.com/account also shows whether SSL is on, in the DNS box under "Your sites". Until you add a certificate, the panel's Settings page shows the warning "The primary domain is not secured with SSL".
Before you start: the domain must point to the site
Let's Encrypt verifies your domain by checking it from the internet. This means the domain's DNS records (A for @ and for www) must already point to your site. If you have just changed them, wait: DNS changes can take from a few minutes up to 24–48 hours.
At host.appalbania.com/account, the DNS box shows the status: when it says the domain points here, you can continue. If it says the domain is not pointed yet, follow the Domain and DNS chapter first.
Free certificate with Let's Encrypt
This is the recommended choice for most sites: it is free and you do not need to buy anything.
- Sign in to your account and click Open hosting panel (no second password).
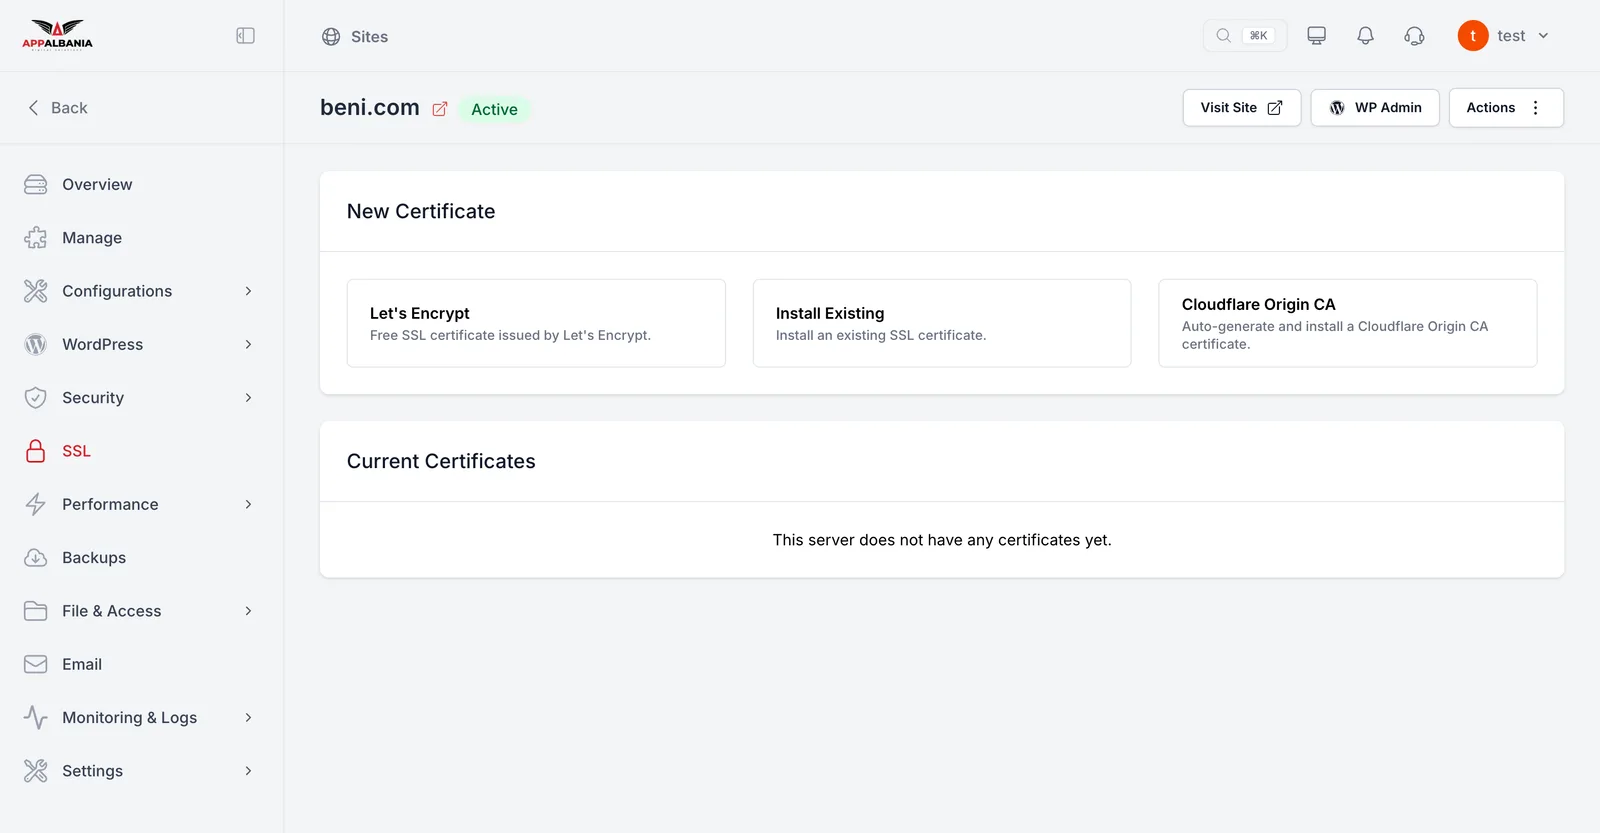
- Open your site and choose SSL in the sidebar.
- Under New Certificate, choose Let's Encrypt.
- Confirm and wait for the certificate to be issued.
- Check the Current Certificates list and the Overview page: HTTPS should be Enabled.
- Open the site in your browser with
https://to test it.
For a longer walkthrough, see Free SSL and HTTPS.
Your own certificate: Install Existing
If you bought a certificate yourself (for example from a certificate provider), choose SSL → New Certificate → Install Existing and fill in the fields the panel shows with your certificate's details. Note: purchased certificates have an expiry date, and renewing them remains your responsibility.
Sites behind Cloudflare: Cloudflare Origin CA
If your domain goes through the Cloudflare proxy (the orange cloud in Cloudflare), choose SSL → New Certificate → Cloudflare Origin CA. The panel generates the certificate automatically. It protects the connection between Cloudflare and your site.
- In the panel, open Configurations → Nginx and turn on "My site is behind Cloudflare proxy — Log real visitor IPs in Nginx", so the logs record your visitors' real addresses.
- Go to SSL → New Certificate and choose Cloudflare Origin CA.
- Check that the certificate appears under Current Certificates.
In your account, the DNS box shows that the domain is behind the Cloudflare proxy when it goes through Cloudflare. That is normal and does not mean anything is wrong.
When the certificate will not issue
The most common cause is DNS. Check these in order:
- The domain does not point here yet. The A records for
@andwwwmust point to the address shown in your account's DNS box. Use the Copy buttons to copy them exactly. - The change is very recent. Wait a few hours (up to 24–48 hours) and try again.
- The domain is behind Cloudflare. Let's Encrypt may not be able to verify the domain through the proxy. Use Cloudflare Origin CA instead.
- www is missing. Make sure
wwwhas its own A record too.
If the problem continues, open a ticket and tell us the domain and the message the panel shows.
After SSL: add security headers
Once HTTPS is Enabled, you can harden the site with security headers (instructions the server sends to the browser so it behaves more safely).
- Open Security → General.
- Turn on Add Security Headers.
- Save the changes and test the site.
Turn on Add Security Headers only when SSL is enabled. Without a certificate, the site may not load correctly. More in Security.
Need help?
Write to support, on WhatsApp +355 67 496 3486 or at info@appalbania.com.